
Last updated: November 19, 2026
Key Takeaways
- Histamine sensitivity changes how you shop, cook, and store food, so timing matters.
- A low-histamine meal plan often starts with fresh protein, plain starches, and simple vegetables.
- Plan the week with small batches, fast freezing, and a few repeat meals instead of heavy fridge stocking.
- Quick, simple cooking methods usually fit best because they keep ingredients fresher for longer.
Meal planning for histamine sensitivity means choosing low-histamine ingredients, cooking them fast, cooling them fast, and avoiding leftovers that sit too long. If histamine is the thing making meals unpredictable, the fix is not a trendy diet; it is a system that keeps food fresh, simple, and repeatable. In this guide to Meal Planning and Cooking for Histamine Sensitivity — The Complete Guide, the goal is a practical routine you can actually follow.
What histamine sensitivity changes in the kitchen

Histamine sensitivity changes the whole timing of shopping, cooking, and storage. The practical rule is simple: the older, longer-cooked, or more fermented a food is, the more likely it is to be a problem, so the kitchen has to work on a same-day or same-session rhythm. That is why a normal “cook once, eat for three days” meal prep pattern often fails here.
The key difference is visible on the plate and in the fridge. A good histamine-friendly meal looks plain on purpose: freshly cooked meat or fish, a plain starch such as rice or potatoes, and one or two vegetables that were prepared recently. A poor version often hides trouble in the details—marinated chicken, canned tomatoes, vinegar-based dressing, leftover soup, or browned meat that sat in the slow cooker for hours.
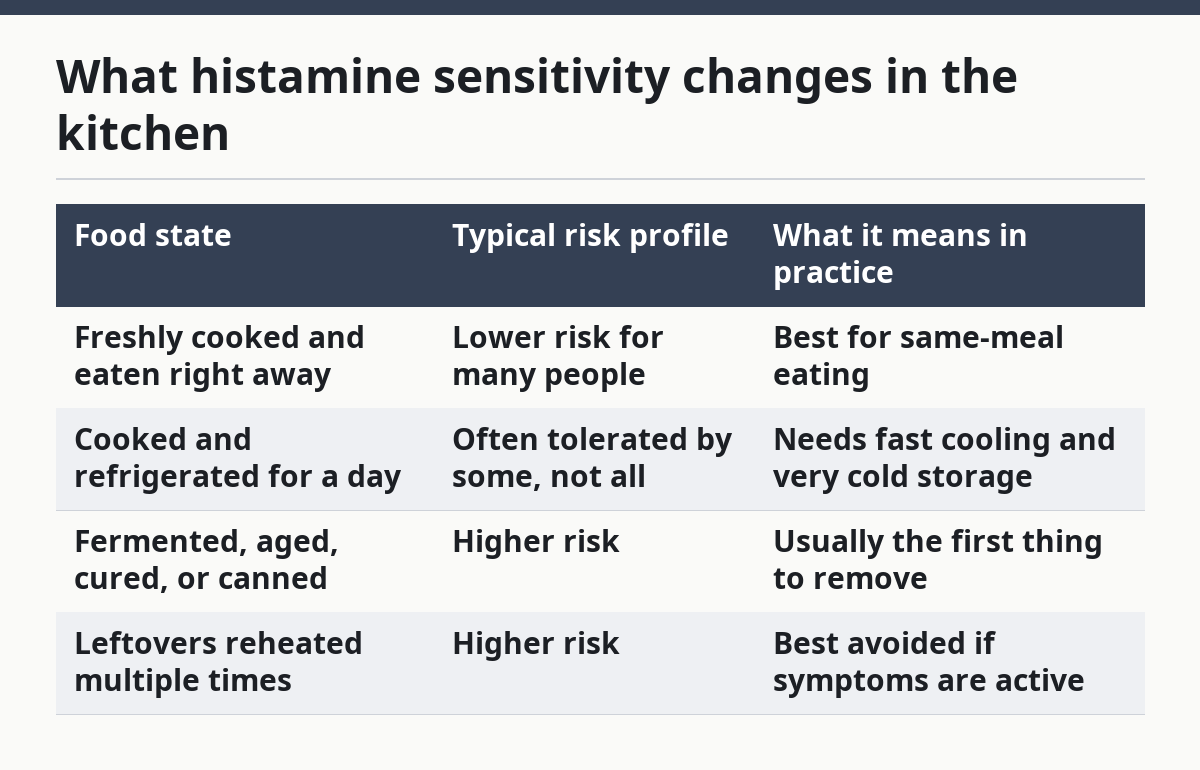
A useful way to think about it in Meal Planning and Cooking for Histamine Sensitivity — The Complete Guide is by storage time, not just ingredients, and it is best to consult a professional if symptoms are significant:
| Food state | Typical risk profile | What it means in practice |
|---|---|---|
| Freshly cooked and eaten right away | Lower risk for many people | Best for same-meal eating |
| Cooked and refrigerated for a day | Often tolerated by some, not all | Needs fast cooling and very cold storage |
| Fermented, aged, cured, or canned | Higher risk | Usually the first thing to remove |
| Leftovers reheated multiple times | Higher risk | Best avoided if symptoms are active |
A lot of generic advice fails because it focuses only on lists of “safe foods” and ignores time. That leaves people with recipes they cannot actually use. The better plan is to build meals around a 30- to 60-minute window: shop, cook, eat, then cool and store anything left over immediately. For medical questions, especially if symptoms are severe or you have overlapping allergies, a registered dietitian or clinician should help interpret your personal triggers. For general food handling, the USDA Food Safety and Inspection Service is a useful reference.
Which foods usually fit a low-histamine meal plan?
A low-histamine meal plan usually works best when it starts with fresh protein, plain starches, and vegetables that are not fermented, aged, or heavily processed. That does not mean every “safe” food is safe for every person, but it does give you a dependable shopping frame. For Meal Planning and Cooking for Histamine Sensitivity — The Complete Guide, the safest starting point is still individualized, so consult a professional when symptoms are complex.
The useful visual is the grocery cart. If the cart is full of jars, deli items, sauce packets, and “ready to eat” items with long ingredient lists, the plan is drifting the wrong way. If the cart is mostly raw or plainly prepared foods, the plan is easier to control.
-
Choose one fresh protein for the day. Buy chicken, turkey, lamb, beef, or a very fresh fish source if you use fish.
Check: The sell-by date and how soon you plan to cook it.
Do not: Buy meat intended to sit in the fridge for several days before cooking. -
Pick one starch that cooks cleanly. White rice, potatoes, sweet potatoes, quinoa, or oats are common anchors.
Check: Whether the package is plain, not seasoned.
Do not: Choose instant mixes with flavor packets. -
Add low-complexity vegetables. Zucchini, carrots, cucumbers, lettuce, green beans, and broccoli are common choices.
Check: Freshness and whether the vegetable is meant to be eaten raw or cooked.
Do not: Assume any vegetable is fine just because it is “healthy.” -
Keep fats simple. Olive oil, ghee if tolerated, or a plain cooking fat works better than sauces.
Check: That the fat has no vinegar, garlic paste, or spice blends mixed in.
Do not: Use bottled dressings unless every ingredient is known to be tolerated. -
Build flavor with herbs you can identify. Parsley, chives, basil, and thyme are common starting points.
Check: One herb at a time when you are testing tolerance.
Do not: Use multi-spice blends if reactions are still active. -
Keep a short, repeatable list. Ten reliable ingredients beat thirty uncertain ones.
Check: Whether the same foods can cover breakfast, lunch, and dinner.
Do not: Chase variety before stability.
The foods that most often trip people up are not exotic. They are ordinary items with hidden processing: cured meats, aged cheese, soy sauce, vinegar, tomato products, sauerkraut, kombucha, and canned fish. Those are not automatically forbidden in every case, but they are the wrong place to start when symptoms are active. If you are unsure, consult a clinician or dietitian familiar with histamine issues. The NIH Office of Dietary Supplements and the USDA Food Safety and Inspection Service are useful external references for broader nutrition and food-safety guidance.
One honest limitation matters here: histamine sensitivity is highly individual. A food that fits one person’s plan may still cause symptoms for another, especially when mast cell issues or GI conditions are part of the picture. This is not a diagnosis-by-website situation. The safest move is to use a short elimination-and-retrial approach under medical guidance if the symptoms are significant.
How should you plan a week of meals without leftovers becoming a problem?

You should plan a week by cooking in small batches, freezing portions quickly, and repeating a few reliable meals instead of trying to stock the fridge with ready-made dishes. That is the difference between a plan that works on paper and one that works at 6 p.m. on a weekday.
The central idea is not “meal prep” in the usual sense. It is “ingredient prep with short storage.” Cook once, eat once, and freeze what you will not use within a very short window. If you need to keep food for later, the freezer is usually the safer tool than the refrigerator.
-
Pick 3 breakfasts, 3 lunches, and 3 dinners. Use the same base foods in different forms.
Check: Every meal can be made from ingredients you already know.
Do not: Design a menu around novelty. -
Assign one protein to each cooking day. For example, chicken on Sunday, beef on Wednesday, fish only if it will be cooked and eaten immediately.
Check: Cooking day equals eating day when possible.
Do not: Leave cooked protein in the fridge for an open-ended stretch. -
Use a 24-hour or shorter fridge rule for cooked food if that is your personal threshold. Some people tolerate longer, but shorter is simpler.
Check: Label containers with the cooking date and time.
Do not: Guess whether a container is “probably fine.” -
Freeze extra portions in shallow containers. Thin portions cool faster and freeze faster.
Check: The food is wrapped or sealed before freezer burn starts.
Do not: Put a deep, steaming pot straight into the freezer. -
Build one emergency meal shelf. Rice, canned coconut milk if tolerated, plain oats, and shelf-stable tolerated items can cover a bad day.
Check: Each item is something you have already used successfully.
Do not: Stock emergency food with mystery ingredients. -
Review the week in 10 minutes before shopping again. Note what triggered symptoms, what kept well, and what went unused.
Check: The next list is shorter, not longer.
Do not: Keep buying foods that never get cooked.
Here is a practical 3-day rotation that stays close to the basics:
| Meal | Example | Why it tends to work better |
|---|---|---|
| Breakfast | Oats with pear or apple | Simple, fast, low processing |
| Lunch | Rice, chicken, zucchini | Freshly cooked, easy to repeat |
| Dinner | Potatoes, turkey, carrots | Mild flavor, short ingredient list |
The visual test is plain: if the week’s menu can be cooked with one cutting board, one sheet pan, and one pot, it is probably the right size. If it requires multiple sauces, long simmering, and several days of refrigerator time, it is probably too complex for active histamine sensitivity.
What is the safest way to cook when histamine is the issue?
For Meal Planning and Cooking for Histamine Sensitivity — The Complete Guide, quick, simple methods usually fit best because they reduce storage time and keep ingredients as fresh as possible. That means short roasting, steaming, boiling, or pan-cooking rather than slow-cooking food for hours and then keeping it warm. If you need a personal medical plan, consult a clinician.
The important detail is not just the method; it is the finish. Food that is browned, cooled, and served promptly is one thing. Food that sits in a warm appliance for hours is another. The longer cooked food stays in the temperature range where microbes can grow, the more likely histamine becomes a problem.
-
Start with very fresh ingredients. Cook meat or fish the same day you buy it if possible.
Check: The food smells normal and has not been sitting in the fridge for days.
Do not: Rely on “it still looks okay.” -
Use fast cooking methods. Roast chicken pieces at 200°C / 400°F, steam vegetables, or boil potatoes until just tender.
Check: The food reaches the right internal temperature and is fully cooked.
Do not: Keep reheating the same dish while you cook other parts. -
Season lightly. Salt, olive oil, and one herb are enough at the beginning.
Check: The seasoning list fits on one line.
Do not: Add vinegar, soy sauce, tomato paste, or spice blends. -
Plate immediately after cooking. Eat while the food is fresh.
Check: The meal reaches the table within minutes, not after an hour.
Do not: Leave it in a turned-off oven or on the counter. -
Cool leftovers fast if you are keeping them. Spread food in shallow containers and refrigerate promptly.
Check: Steam is gone quickly and the container is cold soon after.
Do not: Seal a large hot batch and let it warm the fridge. -
Reheat once. Bring food back to steaming hot, then serve.
Check: Only the portion needed is reheated.
Do not: Reheat the same container repeatedly.
This is where a lot of articles get lazy and say “avoid leftovers” without explaining the practical reason. The real issue is time plus handling. A casserole that has sat for 48 hours is not the same as rice cooled promptly and frozen the same day. Those are different tools, and the first one is much more likely to fail.
A plain roasting pan, a rice cooker, and a quick-read thermometer can cover most of the work. The thermometer matters because “looks cooked” is not a reliable standard, especially for poultry. For food safety, use recognized temperature guidance from a credible public-health source such as the U.S. Department of Agriculture’s Food Safety and Inspection Service. If you are unsure about safe cooking temperatures or storage timelines, that is a good point to consult a dietitian or food safety authority.
What does a low-histamine pantry look like?
A low-histamine pantry looks short, plain, and boring in the best possible way. It is built around foods that can be cooked from scratch in under 30 minutes, not around sauces and preserved items that hide several triggers in one label.
The visual difference between a good pantry and a poor one is immediate. In the good version, the front shelf holds rice, oats, salt, oil, and plain herbs. In the bad version, the shelf is packed with marinades, bouillon cubes, vinegars, canned sauces, spice mixes, and “health” snacks with long ingredient panels.
| Pantry item | Usually useful starting point | Common problem |
|---|---|---|
| Rice | White or brown rice | Flavored packets |
| Starches | Potatoes, oats, quinoa | Preseasoned mixes |
| Oils | Olive oil, tolerated cooking fat | Infused oils with garlic or chili |
| Flavor | Salt, parsley, basil, thyme | Spice blends with hidden additives |
| Sweeteners | Maple syrup, if tolerated | Syrups with flavoring or preservatives |
| Shelf proteins | None, or only tolerated options | Cured meats, jerky, canned fish |
-
Clear out the obvious triggers first. Move vinegar, soy sauce, fermented condiments, aged cheese, and cured meats out of daily reach.
Check: The shelf no longer offers those items by habit.
Do not: Keep trigger foods “just in case” if symptoms are active. -
Group foods by use, not by brand. Put breakfast items together, then lunch and dinner staples.
Check: You can see a meal forming at a glance.
Do not: Scatter ingredients across the kitchen. -
Reduce label reading to the essentials. Look for short ingredient lists with no hidden fermentations.
Check: You can pronounce and identify every ingredient.
Do not: Buy items because the front label says “natural.” -
Keep a “yes” bin and a “maybe” bin. The yes bin contains foods already tolerated; the maybe bin holds test foods.
Check: The yes bin is the one you reach for first.
Do not: Mix untested foods into daily cooking. -
Use portion-sized freezer containers. One meal per container prevents repeated thawing.
Check: The portion matches one sitting.
Do not: Freeze a giant block that needs repeated handling. -
Keep the pantry visually calm. Fewer open jars and fewer mixed ingredients lower the odds of accidental exposure.
Check: You can find dinner in under a minute.
Do not: Let the pantry become a puzzle box.
A common mistake is stocking “safe” snack foods and forgetting that many of them are only safe in theory. Even a perfect pantry fails if it encourages grazing on packaged bars, flavored crackers, or long-open containers. This is one place where simplicity beats variety.
How do you handle breakfast, lunch, and dinner without getting bored?
You handle breakfast, lunch, and dinner by changing the form of the same few ingredients, not by adding more ingredients. That keeps the menu predictable while still giving the plate some movement.
The easiest way to see it is to separate base, protein, and vegetable. The base can be rice, potatoes, or oats. The protein can be chicken, turkey, lamb, or beef. The vegetables can rotate through carrots, zucchini, cucumber, and lettuce. If those pieces change shape, temperature, and texture, the meal feels new even when the ingredients are familiar.
For breakfast, texture matters most. A bowl of oats, baked apples, or a simple egg-based meal can work if tolerated. For lunch, a bowl format is practical because it keeps portions visible. For dinner, plated food with one hot starch and one hot protein is easier to digest for many people than a heavily mixed dish.
| Meal | Structure | Good visual sign | Bad visual sign |
|---|---|---|---|
| Breakfast | Soft base, mild fruit, simple fat | One bowl, 3 ingredients | Sweetened with many toppings |
| Lunch | Grain bowl or plate bowl | Distinct sections, not a mush | Heavy sauce covering everything |
| Dinner | Protein + starch + vegetable | Clean edges on the plate | Mixed casserole with unknown extras |
-
Repeat the base, change the cut. Dice potatoes one night, mash them another, roast them another.
Check: The ingredient stays the same even if the texture changes.
Do not: Add a new sauce every time you get bored. -
Use temperature as variety. Serve one meal warm and another room-temperature if tolerated.
Check: The food is still freshly prepared.
Do not: Let room temperature become “left out for hours.” -
Change herbs, not the whole recipe. Basil one day, parsley another day.
Check: Only one herb changes at a time.
Do not: Layer multiple seasonings while testing tolerance. -
Keep dessert simple. Fruit, plain rice pudding if tolerated, or oatmeal-based options are more predictable than baked goods with many additives.
Check: The dessert uses ingredients already in the plan.
Do not: Use packaged sweets with unknown emulsifiers or flavorings. -
Watch portion size. A moderate plate is easier to evaluate than a huge one.
Check: You can tell what caused symptoms.
Do not: Mix multiple new foods in one meal. -
Test boredom with structure, not risk. Add a crisp vegetable or change the cooking method before adding a questionable ingredient.
Check: The change is small enough to trace.
Do not: “Cheat” with a high-risk condiment.
This approach is not for people who want a highly varied, restaurant-style menu every day. That is the trade-off. Histamine management often asks for repetition first and creativity second. If you need medical nutrition support because your diet has become too narrow, a dietitian can help widen the menu safely.
What should you do when symptoms flare after a meal?
When symptoms flare after a meal, you should stop experimenting, return to the last safe foods, and review timing, storage, and ingredients one by one. The goal is to identify the pattern, not to guess wildly and cut half the pantry.
A useful review sequence is simple: what was eaten, how fresh it was, how it was stored, and what changed from the last tolerated meal. This is where a written log helps more than memory. Histamine reactions are easy to misattribute because the trigger may be the leftover container, the dressing, the spice mix, or the food itself.
-
Write down the meal immediately. Include ingredients, time cooked, and time eaten.
Check: You can reconstruct the whole meal later.
Do not: Rely on “I think it was the chicken.” -
Note storage details. Record whether the food was fresh, refrigerated, or frozen.
Check: Leftovers and fresh food are separated in the notes.
Do not: Skip this step because it seems minor. -
Return to the last clearly safe meal. Use that as the baseline for 24 to 48 hours if symptoms are mild and your clinician has advised that approach.
Check: The menu becomes simpler, not more creative.
Do not: Keep stacking new foods onto a flare. -
Remove the newest variable first. The newest ingredient is the one to question first.
Check: One change is removed at a time.
Do not: Ban every food in sight. -
Review cooking method and timing. Long storage, slow cooking, or repeated reheating can matter more than the ingredient list.
Check: Was the meal eaten within the same day?
Do not: Assume only “bad foods” cause flares. -
Seek professional advice if reactions are strong, frequent, or include swelling, breathing trouble, or dizziness.
Check: Severe symptoms get medical attention promptly.
Do not: Treat a serious reaction as a kitchen issue only.
Because of that, two authoritative references are worth knowing here: the U.S. Food and Drug Administration for general food safety guidance, and the USDA Food Safety and Inspection Service for storage and cooking basics. Those sources will not solve histamine sensitivity by themselves, but they do help you keep the food-handling side clean. If symptoms are severe or unclear, a clinician should rule out other causes before you narrow the diet further.
What a workable histamine-sensitive kitchen actually looks like
A workable histamine-sensitive kitchen is not a perfect kitchen; it is a controlled one. The food is fresh, the ingredients are few, the containers are labeled, and the fridge is used as a short stop, not a warehouse.
The clearest visual marker is the prep station. In a good setup, you see a cutting board, a knife, a pot, and one or two containers. In a messy setup, you see half-used jars, mystery leftovers, and multiple sauces crowding the counter. The good setup makes the next meal obvious.
Here is the standard I would use: if a meal cannot be described in one sentence, it probably needs trimming. “Chicken, rice, and zucchini with olive oil and salt” is manageable. “Chicken thigh in a fermented marinade with three condiments and a leftover side from two nights ago” is not.
The honest drawback is that this way of eating can feel repetitive, especially in the first few weeks. That is not a sign that it is failing. It is often the price of getting symptoms under control. Once the base meals are stable, you can widen the menu in small, testable steps instead of by force.
If the plan is making you fearful of food, if the ingredient list is shrinking week after week, or if you are losing weight unintentionally, that is the point to get professional support. A dietitian familiar with elimination diets can help keep the plan nutritionally adequate while you figure out your personal threshold.
The best result is not a perfect “low-histamine diet.” It is a kitchen routine that lets you eat without guessing every single day.
Drafted with AI; not yet reviewed by a person.
