Last updated: November 19, 2026
Key Takeaways
- A freezer inventory list should show contents, storage location, and storage date.
- Include the food name, batch date, zone, portion count, and a use-first mark.
- Each freezer zone works best when it has one purpose and one label.
- Update the freezer list whenever food changes, and check it fully every 7 to 14 days.
A How to Set Up a Low Histamine Freezer Inventory List helps keep frozen food from turning into mystery bags, lost portions, and spoiled plans. Quick Answer: one simple list with 3 core details can keep your freezer manageable, and a basic setup takes about 10 minutes. This guide shows exactly what to write, where to keep it, and how to use it.
What a freezer inventory list has to do
A freezer inventory list has to tell you what is in the freezer, where it lives, and how long it has been there. That means 3 details every time: the item name, the freezer zone, and the date it went in. Because of that, the list should stay short enough to scan fast.
Picture this: you open the freezer after a long day and need a meal that fits a low histamine routine. You do not want to guess, dig through three bins, or thaw the wrong thing. The list should make that decision in under 1 minute.
Before you start, gather a few simple tools:
- Magnetic notepad for the door
- Index card as a backup master list
- Marker pen for fast notes
- Label maker if you want cleaner labels
- Sheet pan for cooling and portioning before freezing
- Freezer bins to divide zones
The best list is simple enough that you will actually update it. A fancy spreadsheet that stays closed is worse than a plain card on the fridge.
For a related setup idea, see the page on freezer meal planning and the guide to low histamine meal prep tips.
How do I set up a freezer inventory list?
Set it up in 5 steps: map the freezer, make a master list, assign zones, record each batch, and set a use-first rule. After that, the system only needs small updates.
Picture this: you are standing in front of the freezer with a marker in one hand and a notepad in the other. You need a system that takes 10 minutes to set up, not an afternoon of sorting. Start with the layout, then write the list to match it.
- Divide the freezer into zones. Pick 3 to 6 spots you will use every time, such as top shelf, middle shelf, bottom shelf, door, left bin, and right bin. When this works, you can point to the place without opening every bag.
- Assign one code to each zone. Use short labels like A1, A2, B1, or simple words like top, middle, and bin left. Keep the codes on the door and on the list so you do not rename them later.
- Create your master inventory. Use an index card, magnetic notepad, or a small sheet with columns for item, zone, batch date, and portion count. If the layout is clear, you can scan the whole freezer in one glance.
- Record each batch the moment it goes in. Write the food name, the zone, and how many portions you froze. If you froze 4 chicken portions on one sheet pan, write “chicken, A2, 4 portions, 11/14” or your own date format.
- Mark the use-first items. Put the oldest batches at the top of the list or add a star next to them. The list is working when you can grab the oldest low histamine food without opening every container.
A freezer inventory list fails when it tries to do too much. Keep the first version on one card or one note. If you need a second page, the system is already getting too full.
What should I write on the list?
Write the food name, the batch date, the zone, the portion count, and a use-first mark. Those 5 fields are enough for a practical freezer inventory list, and they keep the list readable.
Picture this: you are tired and your brain wants shortcuts. The list should still make sense on a bad day, so use short, plain words that a guest could read without asking questions. “Soup” is too vague. “Pumpkin soup, B1, 2 portions, 11/02” tells the story.
Use this format for each line:
- Item name
- Zone code or bin name
- Batch date
- Portion count
- Use-first note if needed
A few examples:
- Salmon cakes, top shelf, 3 portions, 11/08
- Turkey broth, left bin, 6 jars, 11/10
- Rice, middle shelf, 4 portions, 11/12
If you use a label maker on the containers, make the list match the label exactly. If the container says “turkey broth,” do not write “bone broth” on the list unless you always use the same term. Mixed names waste time.
The sheet pan matters here too. It helps you freeze portions flat before they go into freezer bins, so your counts stay easy to read and stack. Flat packs are easier to inventory than lumpy bags. For more on portioning, see freezer meal planning.
How to keep freezer zones from getting mixed up
Freezer zones stay useful when each zone has one job and one label. That keeps the inventory list honest instead of becoming a rough guess.
Picture this: you open a full freezer and the same kind of food is spread across three shelves. That is how low histamine plans get messy. A zone system gives every item a home, so the list does not drift out of date in 2 weeks.
A simple zone setup might look like this:
- Top shelf: cooked portions you will use first
- Middle shelf: proteins or soups
- Bottom shelf: backup items or bulk bags
- One bin: breakfast items
- One bin: vegetables
Use freezer bins only if they help the zones stay fixed. If the bin gets stuffed and hides food, it is doing the opposite of its job. The point is not storage volume. The point is visibility.
Match the inventory list to the zones, not to memory. If you move an item from one bin to another, change the list the same day. Waiting until later is how good systems rot. For a broader organizing approach, our food storage labels page shows a simple way to keep names consistent.
How often should I update a freezer list?
Update the freezer list every time you add or remove food, and do a full check every 7 to 14 days. That pace keeps the list close to reality without turning it into a chore.
Picture this: you just used the last two portions of broth, or you added a fresh tray of chicken. If you do not change the list right then, the list stops being a tool and turns into a guess. A 30-second update beats a cleanup session later.
Use these update habits:
- Cross out food the same day it leaves the freezer
- Add new batches before you shut the door
- Move older items to the top of the list
- Recount portions when you break a batch into smaller packs
The truth is, a freezer list only works when it survives real life. If you cook once a week, update on that day. If you batch cook twice a month, still do a quick check in between.
A magnetic notepad on the freezer door is the easiest place for most people. If you prefer a neat archive, copy the active list to an index card each week and keep the old one in a drawer. For related organization, see kitchen organization tips.
Common mistakes that make the list useless
The list becomes useless when it is too vague, too busy, or too far from the freezer. Those mistakes cost time, food, and trust in the system.
Picture this: you are staring at “chicken stuff” written on a page with no date and no zone. That line helps nobody. It does not tell you what to eat first, where to find it, or whether it is still part of the low histamine plan.
Avoid these common errors:
- No portion count. You cannot plan meals if you do not know whether you have 1 serving or 5.
- No zone label. You will open every shelf and still miss the item.
- Too much detail. Notes about seasoning or serving ideas slow down updates.
- Using memory only. If the list lives in your head, it is not a system.
- Letting old entries stay active. A stale list makes you trust the wrong food.
A plain label beats a clever one. Keep the words short, the layout fixed, and the update habit boring. Boring is good here.
This is not the page for container shopping or label style debates. The point is inventory tracking, not a prettier freezer. If the list makes it easier to use older food first, it is doing its job.
Low histamine freezer inventory list example you can copy
A working freezer inventory list can fit on one index card with 4 columns and still stay readable. Keep it simple enough to update while your hands are cold.
Picture this: you want a format that takes less time than putting groceries away. A copyable layout solves that. Use the same order every time so your eyes know where to land.
| Item | Zone | Batch Date | Portions |
|---|---|---|---|
| Turkey broth | left bin | 11/10 | 6 |
| Chicken patties | top shelf | 11/08 | 4 |
| Cooked rice | middle shelf | 11/12 | 3 |
| Vegetable soup | right bin | 11/14 | 2 |
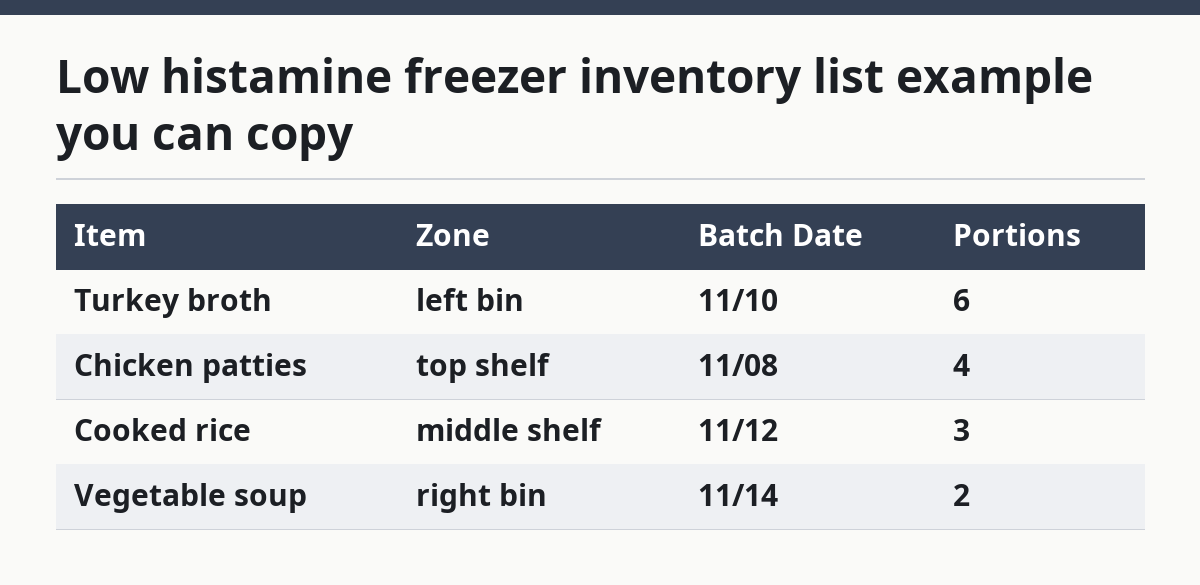
If you want a use-first marker, add a star before the oldest item or circle it. Keep that mark on the list, not hidden in a note app you will not open in the kitchen.
This layout works with paper, a magnetic notepad, or a phone photo of the same card. Pick one place and keep it there. A list that moves around is not a list.
For more meal planning help, the hub on low histamine meal prep tips can sit next to this system without replacing it.
How do I track what is in my freezer?
Track what is in your freezer with one master list that shows the item, the zone, the batch date, and the number of portions. That gives you a live snapshot without forcing you to open every container. Check it each time you freeze or remove food, then update the oldest items first.
What should I write on freezer labels?
Write the food name, the date, and the portion count on freezer labels. If you use zone codes, add those too so the label matches the inventory list. Keep the wording plain and exact, like “chicken soup, A2, 2 portions, 11/14.” For the safest handling basics, see the FDA’s guidance on freezing and food safety and the USDA’s freezing and food safety page.
How often should I update a freezer list?
Update the freezer list every time you add or use food, then do a full review every 7 to 14 days. That keeps the list close to what is actually inside the freezer. If you batch cook on a set day each week, update right after that session so nothing gets missed.
Drafted with AI; not yet reviewed by a person.