Last updated: November 19, 2026
Quick Answer: for Low Histamine Food Prep and Batch Cooking Systems — The Complete Guide, the practical starting point is 1 cook session, 1-day portions, and freezer-first storage for the extra food. Low histamine cooking works best when you cook fast, chill fast, and freeze fast. That is the whole system, and it matters more than any one recipe.
This guide shows the prep steps, storage rules, and batch-cooking setup that keep leftovers from becoming a problem. It also shows where people go wrong. For general food handling, the USDA Food Safety and Inspection Service says leftovers should be refrigerated within 2 hours, and the CDC uses the same 2-hour rule for perishable food.
Key Takeaways
- Histamine risk rises when cooked food sits warm or slowly cools.
- A safer approach is small batches, rapid cooling, and freezer-first storage.
- Fresh ingredients help, but the clock matters just as much as the food list.
- Good prep means planning portions before you cook, not after the pot is full.
- A low histamine kitchen is built around speed, labels, and clean containers.
What a low histamine batch-cooking system actually does
A low histamine batch-cooking system keeps food out of the danger zone for too long. That means you cook with a plan, cool food quickly, and store portions so you can reheat only what you need.
Picture this: you’ve made a big pot of soup, and now the whole kitchen smells great. The trap is leaving it in the pot for hours, or scooping from it all week. The right system is portion-first, not pot-first. The difference is plain on the plate and in the fridge.
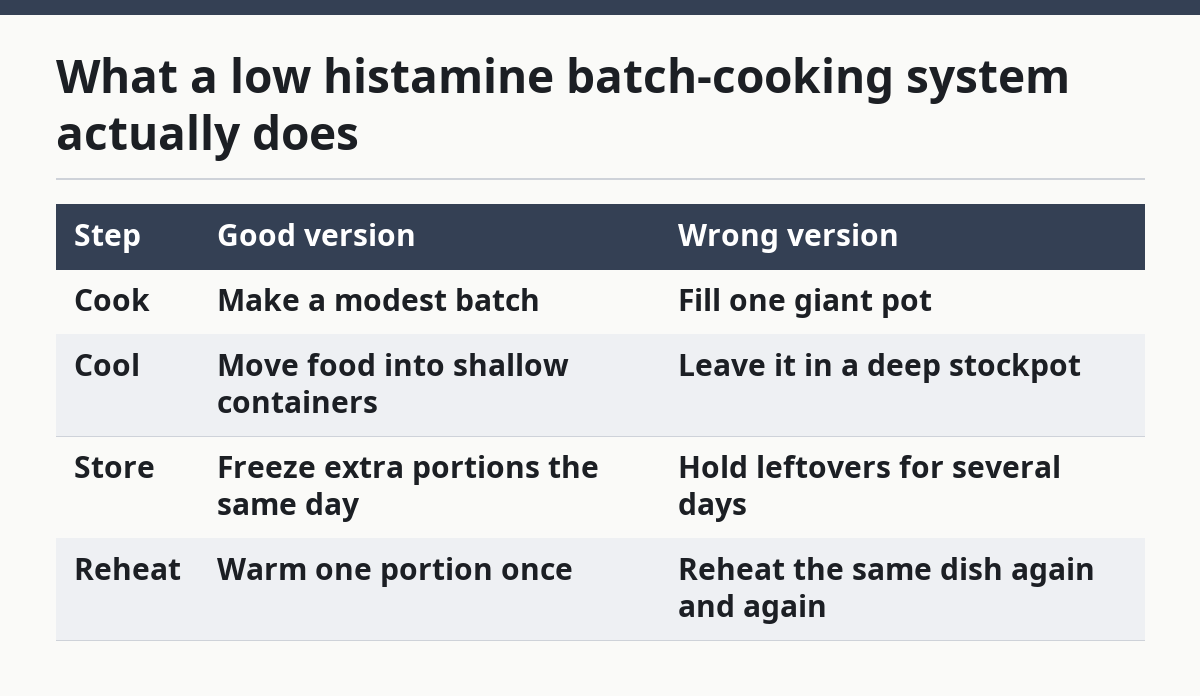
The basic logic is simple:
| Step | Good version | Wrong version |
|---|---|---|
| Cook | Make a modest batch | Fill one giant pot |
| Cool | Move food into shallow containers | Leave it in a deep stockpot |
| Store | Freeze extra portions the same day | Hold leftovers for several days |
| Reheat | Warm one portion once | Reheat the same dish again and again |
A food safety agency can give you the general cooling and storage logic, and the low histamine angle adds a stricter rule: less time in the fridge is better. The United States Department of Agriculture Food Safety and Inspection Service has clear guidance on cooling and refrigerating leftovers, and the National Institutes of Health’s MedlinePlus pages on histamine intolerance are useful background reading. For an additional food safety reference, the FDA Food Code also emphasizes time and temperature control for perishable foods.
Here’s the catch: low histamine prep is not just about “safe” food. It is about food that still behaves well after storage.
How do you prep low histamine food without making a mess of the fridge?
You prep low histamine food by assigning every ingredient a job before you start. One bin for wash-and-chop, one tray for cooking, one stack of containers for cooling, and one freezer shelf for overflow.
Picture this: you’ve got lettuce wilting on the counter, cooked rice in a hot pot, and no labels on the containers. That setup creates waste fast. A tidy station saves both time and tolerance. The key is to shrink the gap between cooking and freezing.
Use this prep order:
- Pick one protein, one starch, and two vegetables. Check that all four ingredients are the freshest version you can get. Do not start with a 12-item menu.
- Wash and dry everything before heat goes on. Check for dry leaves and dry surfaces. Do not wash after cooking starts unless the recipe needs it.
- Set out containers first. Check that you have shallow, lidded containers or freezer bags ready. Do not wait until the pot is done.
- Cook in a short window. Check the time you start and the time the food comes off heat. Do not let one pan sit while you finish another task.
- Portion while the food is still hot enough to move. Check that each container is no more than a meal portion. Do not pile everything into one deep dish.
- Cool fast. Check that containers are spread out so air can move around them. Do not seal in heat.
- Freeze the extra portions the same day if possible. Check that labels include the dish name and date. Do not trust memory.
The prep list stays boring on purpose. Boring is good here.
A good prep day usually has one cutting board for raw food, one for cooked food, and a stack of 2-cup or similar shallow containers for portions. Shallow beats deep because heat escapes faster. That is the visual clue you want: wide surface, thin layer, lid nearby but not snapped on until the steam drops.
The correct way to cool food before it goes into storage
You cool low histamine food by speeding up the drop from hot to cold, then moving it into the fridge or freezer without delay. The goal is not to “let it come down slowly.” The goal is to get it out of warm holding time.
Picture this: your stew is done, but the center is still steaming hard. If you cram it into a deep tub and seal it shut, the middle stays warm far too long. Fast cooling is the whole point. The shape of the container matters as much as the recipe.
Use this order every time:
- Split the batch into shallow portions. Check that food is spread thin, not stacked deep. Do not keep it in one big vessel.
- Vent the container briefly if steam is heavy. Check that the lid is loose or off at first. Do not trap heat.
- Place containers with space around them. Check that air can reach the sides and top. Do not crowd them into one tight stack.
- Move to the fridge once the heat has dropped enough to stop obvious steaming. Check that the food is no longer radiating strong heat. Do not wait until bedtime.
- Freeze the portions you won’t eat soon. Check that freezer space is clear and labeled. Do not leave “maybe later” food in the fridge.
- Reheat only what you will eat. Check that the portion is single-meal sized. Do not rewarm the whole tray.
The setup is easy to spot. The food sits in a thin layer, the container is not bulging with steam, and the fridge is not packed so tightly that cold air can’t move. The wrong look is a tall pot, a tight lid, and a shelf crowded with warm leftovers.
Here’s a simple comparison:
| Cooling method | What it looks like | Why it helps |
|---|---|---|
| Shallow container | Thin layer, broad surface | Releases heat faster |
| Deep pot | Tall mound of food | Holds warmth longer |
| Loose lid at first | Steam can escape | Reduces trapped heat |
| Tight seal right away | Moist heat stays inside | Slows cooling |
The truth is, most leftover problems start before the food ever hits the fridge.
What foods fit the system best?
The foods that fit batch cooking best are the ones that tolerate fast cooking and fast freezing without turning sad or mushy. That usually means plain proteins, simple starches, and vegetables that hold their shape after reheating.
Picture this: you want three dinners from one prep session, but you also need food that won’t fall apart by day three. Not every healthy food is a good batch food. That is where a lot of people get tripped up.
Good batch-cooking candidates often include:
- plain chicken or turkey cooked from fresh
- rice or quinoa made in a clean pan
- carrots, zucchini, green beans, or squash cooked until just tender
- olive oil, salt, and simple herbs if you tolerate them
- fruit that is eaten fresh rather than stored cut for long periods
A bad batch food is one that gets better only after long holding, fermentation, or heavy sauce. Think slow-simmered dishes held in the fridge for days, or recipes built around aged, fermented, or leftover ingredients. The longer the food sits, the less friendly it tends to be for people sensitive to histamine.
Use this simple sorting table: if you have a medical condition, medication issue, or a severe reaction history, consult a clinician or registered dietitian before making food rules from a table alone, and use the USDA Food Safety and Inspection Service and MedlinePlus as background sources.
| Ingredient type | Better fit | Poor fit |
|---|---|---|
| Protein | Fresh-cooked poultry, fresh-cooked meat | Aged, cured, or long-held leftovers |
| Starch | Rice, potatoes, quinoa | Strongly seasoned casseroles held for days |
| Vegetable | Carrot, zucchini, green beans | Any vegetable that turns soft and watery fast |
| Flavoring | Salt, fresh herbs, simple oil | Fermented sauces and long-marinated mixes |
A plain meal is not a failure. It is a tool.
How do you build a weekly cooking rhythm that actually holds up?
You build a weekly rhythm by cooking twice, not constantly, and by making freezing part of the plan from the start. The cleanest system is one cook day and one short refresh day, with freezer meals carrying the middle.
Picture this: it’s Sunday afternoon, and you’re deciding whether to make enough food for five days. That sounds efficient, but with low histamine prep, “more days in the fridge” is usually the wrong move. Freeze the extra now. That simple choice changes the week.
A practical rhythm looks like this:
- Choose two cook days. Check your calendar for the days you can cook without rushing. Do not plan a huge prep before a late-night shift.
- Plan the same base ingredients for both days. Check that the shopping list repeats on purpose. Do not build a different menu every time.
- Cook one protein, one starch, and two vegetables per session. Check that each item is plain enough to reheat well. Do not add a sauce that shortens storage life.
- Portion for one meal at a time. Check that each box is a single serving or two at most. Do not make family-sized trays unless you will empty them immediately.
- Freeze surplus portions before the fridge becomes a holding area. Check that the label includes the date. Do not leave mystery containers behind the milk.
- Use the oldest frozen food first. Check the labels in order. Do not keep pushing the same box to the back.
A useful weekly rhythm also keeps a small “safe backup” shelf in the freezer: one plain protein, one plain starch, and one vegetable portion. That gives you a real emergency meal in 10 minutes instead of another takeout decision.
The best part is that once the rhythm is set, shopping gets easier too.
What containers, labels, and tools make the system work?
The right tools are the ones that speed cooling, keep portions separate, and make dates easy to see. You do not need a fancy kitchen. You need containers that fit the job.
Picture this: your fridge has three bowls of leftovers, two half-open bags, and no idea what was cooked on Tuesday. That is how good food disappears. Visibility matters more than memory. The container should tell the story at a glance.
A strong setup usually includes:
| Tool | What to look for | Why it matters |
|---|---|---|
| Shallow containers | Broad, low profile | Helps food cool faster |
| Freezer bags | Flat storage when laid down | Saves space and thaws faster |
| Labels | Easy-to-read date and dish name | Stops forgotten food |
| Permanent marker | Writes on tape or labels | Keeps the system legible |
| Sheet pan | Cools small containers with airflow | Improves heat loss |
Here’s the catch: airtight is not the same thing as immediately sealed. A lid that locks in steam too soon can work against you. Let the heat drop first, then close the container fully.
Three tool habits matter most:
- Label before the fridge. Write the dish and date while the food is still on the counter.
- Use same-size boxes when you can. Stacking is easier, and the fridge stays cleaner.
- Keep one freezer shelf or bin for low histamine meals only. Mixing old and new makes it harder to rotate.
A crowded fridge is a bad sign. So is a system that depends on guesswork.
What low histamine meal prep looks like on a real day
Low histamine meal prep looks like a short, disciplined cooking block with fast cleanup after. You are not making a banquet. You are making safe portions that can move into cold storage without waiting around.
Picture this: it’s a work night, and you need food ready in under an hour. The right move is not a complicated sauce or a marathon cooking session. The meal should leave the pan quickly and land in the freezer or on the plate.
A sample prep flow might look like this:
- Start with the item that takes the longest. Check the clock and begin with rice, potatoes, or a protein that needs full cooking. Do not let the shortest task dictate the whole pace.
- Move to vegetables while the first item cooks. Check that you keep the chopping area clean. Do not pile raw scraps near cooked food.
- As each item finishes, portion it immediately. Check that the container is ready before the pan is off heat. Do not make a second round of holding.
- Cool the portions on an open surface. Check that they are spaced apart. Do not stack warm containers on top of one another.
- Wash tools as you go. Check that the sink does not fill with raw boards and knives. Do not leave cleanup until the end.
- Move the food to the fridge or freezer the same day. Check that the containers are dated. Do not rely on smell alone.
The visual difference between good and bad prep is obvious. Good prep ends with clean counters, labeled boxes, and one small plate for dinner. Bad prep ends with one giant pan, scattered lids, and food that has been sitting too long.
A low histamine kitchen does not need perfect recipes. It needs a repeatable finish line.
What mistakes make low histamine batch cooking fail?
The biggest mistake is treating leftovers like they all behave the same way. They do not. A batch cooked meal can become a problem if it sits too long, cools too slowly, or gets reheated over and over.
Picture this: you did everything “right” except one thing — the food stayed in the fridge for five days because you were too busy to freeze it. That one delay can undo the plan. Time is the hidden ingredient. Ignore it and the whole system gets shaky.
The most common mistakes are:
- making huge batches that force long fridge storage
- using deep pots and tall storage containers
- sealing steaming food before it has cooled
- eating from the same container all week
- forgetting labels and eating the oldest food last
- building recipes around leftovers from other leftovers
A cleaner rule set fixes most of that:
| Mistake | Better rule |
|---|---|
| Giant batch | Cook for 1–3 meals, then freeze the rest |
| Deep container | Use shallow boxes |
| Slow cooling | Space out portions |
| Repeated reheating | Heat only one serving |
| No labels | Date every container |
| Fridge hoarding | Move surplus to the freezer early |
This is also where personal tolerance matters. Some people handle certain foods in the fridge for a short time. Others react quickly. If symptoms are severe or changing, a clinician or dietitian who understands histamine issues can help sort out the food pattern without guesswork.
What should a beginner do first?
A beginner should start with one safe meal, one storage container type, and one repeatable cooling rule. That is enough to build a working system without drowning in food theory.
Picture this: you are standing in front of the fridge, trying to build a new routine from scratch. Do not start with ten recipes. Start with one repeatable win. The first win teaches the rhythm.
Use this starter plan:
- Pick one meal you already tolerate. Check that it uses fresh ingredients and simple seasoning. Do not start with a complex sauce.
- Buy matching shallow containers. Check that they fit your fridge shelf. Do not use random sizes that stack badly.
- Set a label habit. Check that every box gets a name and date before it goes cold. Do not assume you will remember.
- Plan to freeze half the batch. Check that the freezer has space before you cook. Do not hope to “find room later.”
- Reheat one portion only. Check that the plate is small enough for one meal. Do not warm extra food just because it is there.
- Review what worked after two rounds. Check whether the container shape, portion size, and schedule were realistic. Do not change five things at once.
The starter setup is plain and boring on purpose. Once it works, you can widen the menu one ingredient at a time. That is how you keep the system useful instead of turning it into another food project that burns out after a week.
What do the rules and labels really mean for safety?
The rules mean you should treat storage time as part of the recipe, not an afterthought. Low histamine prep is stronger when it borrows from food safety guidance on rapid cooling, refrigeration, and clean handling.
Picture this: you’ve got a container on the shelf that smells fine but has been forgotten for days. Smell is not a reliable test. Date and time beat guessing. That is the practical lesson.
For general food safety, the USDA Food Safety and Inspection Service gives plain guidance on refrigerating leftovers and avoiding long warm holding. That guidance is not made for histamine intolerance specifically, but it supports the same core idea: cooled food should move fast into cold storage, and leftovers should not sit around forever.
A second useful source is MedlinePlus, which gives a basic overview of histamine intolerance and why food triggers can vary from person to person. If symptoms are intense, changing, or confusing, a clinician and a registered dietitian can help sort food patterns and rule out other problems.
The low histamine takeaway is simple:
- cool fast
- store short
- freeze extra
- reheat once
- label everything
That is the system in one line.
FAQ
How long can low histamine leftovers stay in the fridge?
Low histamine leftovers are best eaten as soon as practical, and many people choose to freeze extra portions the same day. The exact safe window varies by food, fridge temperature, and personal tolerance, so the strictest useful habit is to shorten fridge time instead of stretching it.
Can I batch cook for the whole week?
You can batch cook for the week only if most of the food is frozen, not held in the fridge. A long fridge run is the weak point in a low histamine plan. Cook in smaller batches and freeze the overflow.
Are soups and stews good for low histamine meal prep?
Soups and stews can work if you cool them quickly in shallow portions and freeze them early. The problem is not the pot of food itself; it is the slow cooling and long storage that often come with it. Deep containers are a bad fit.
What is the easiest first meal to prep?
The easiest first meal is a plain protein, a simple starch, and one or two cooked vegetables that you already tolerate. Keep the seasoning basic and the portion size small. That gives you a clean test of the system without adding extra variables.
Do I need special containers for this?
You do not need specialty gear, but shallow, lidded containers and clear labels make the process much easier. The container shape matters because it affects cooling speed. A deep box is a poor match for food that needs to get cold fast.
Drafted with AI; not yet reviewed by a person.